Monday, 5 August 2013

Dirty Works V Soap and Glory - is it a dupe?

You know when you use a few different products and suddenly one reminds you of another? Well that happened to me whilst I was on holiday.  As mentioned in a previous post, see HERE, I took with me lots of travel sized lotions and potions and whilst using my Soap and Glory products I realised they smelt similar to another product that I had received for my birthday from a friend.

Here are those products:


Dirty Works are a brand of bath and body products that you find for sale in Sainsburys and quite a lot of the Blogs I follow have reviewed them.  I got the package above as a birthday present from a friend who knew I liked Soap and Glory but promised me this brand would be just as good if not better.

However, I don't know if anyone else has noticed this and please note I did say 'similar' and not the same, but it was with Scrub of your life that I first noticed that there was a similar scent to Buff your Stuff and when I got home I used both of the products one after another to look further into it:


Dirty works on the left and Soap and Glory on the right

Neither product look similar and truth me told the Soap and Glory Scrub is much thicker in texture than Dirty Works though the scrub particles are similar.  The similarity comes with the scent and that is all it is, similar.  The fruity smell I have come to know and love with Soap and Glory products is very similar with this particular Dirty Works product and could it be a very good dupe?

The Scrub of your life currently costs £7 for 200ml whereas Buff Your Stuff from Dirty Works costs £3.99 for 200ml which is quite a big saving.


Have you noticed this? Have you tried a Dirty Works product?


Saturday, 3 August 2013

Inhibitif: The End of being a Shave Slave - on holiday!!

You'll probably know by now that I have been trialling Inhibitif on my blog and not only do I like it... I love it. For those of you who haven't read about it, my Inhibitif series can be found:
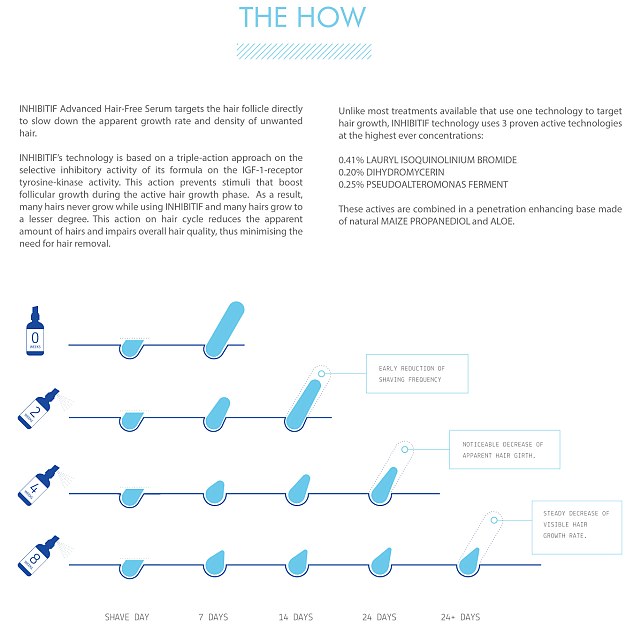
The idea of this product is that you apply Inhibitif evenly on shaved or waxed body areas twice per day for 2 months or until body hair appears nearly invisible. Then reduce application to 3 times per week to maintain results. Then you should see initial results within 2 weeks and then within 2 months hair should appear finer and finer until the hair removal routine becomes easier and less in frequency as the graphic below shows.


The End of being a Shave Slave - on holiday!!

So as I was going away for 6 nights and couldn't take my Inhibitif with me and nor could I at the last minute find a bottle to transfer some into that would be okay for hand luggage (that is all I took) then I would have to go without it and see how my legs reacted.  So before I left, I continued using Inhibitif as you do 3 times a week and I found I had to shave my legs once, twice a week at the most (beforehand it was every other day).


So the morning that I left, my legs were shaved and sprayed leaving them all nice, soft, smooth, hair free and moisurised as shown below:


The End of being a Shave Slave - on holiday!!

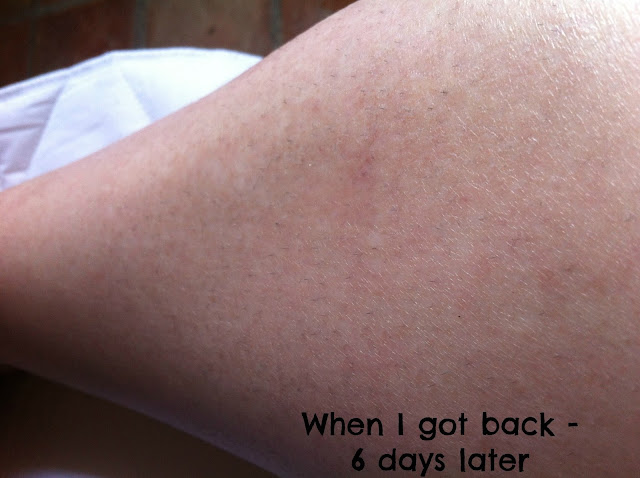
When I came back 6 days later, this is what you can see...


The End of being a Shave Slave - on holiday!!


Just a few small stubbly bits of hair had become visible and for the first time I didn't feel I had to rush out and grab a razor whilst on holiday to shave my legs due to paranoia particularly as I wouldn't have got one in my hand luggage.


Have you tried Inhibitif yet? What are your thoughts on it?


Friday, 26 July 2013

GUEST POST - Home Deco - Wishlist For A Mini Office

Today we have the lovely Hannah guest posting on my blog.  Hannah is the wonderful lady who is responsible for my blog header!... Over to you Hannah!


Hey Everyone,

When Rachel asked me to guest post on her blog I of course jumped at the chance. Recently I've been thinking a lot about turning an empty corner of my bedroom into a mini office. I'm currently blogging from my sofa or bed (not exactly the most creative or best places to blog). I don't have room anywhere else, and I thought turning that corner of the room into my blogging center would be a great idea. So here's my Office Wishlist:


1. Desk:
This Ikea desk is perfect for the small space I have for my mini office. I choose to keep it white as my room is white, and I'm really liking Home Decor that's white with a pop of colour added through accessories at the moment. You can find this desk HERE! 

2. Cushion:
I chose this cushion to put onto the white desk chair I chose. It adds a more comfy feel to the clinical white, and I chose this one because it reminds me of home and makes me happy. This cushion is from Debenhams and you can find it HERE!  

3. Oh My Deer Print:
I thought a print would brighten up the space and add in more colour. I was looking for an inspirational print but when I saw this I thought it was too cute not to add to this wishlist! You can find it HERE! 

4. Candle:
I think a candle is always something lovely to have in an office to give off a scent and also look pretty. I'm very picky about scents I'm not really fan of most scents either flowery, spicey, or pretty much the majority of scents on the market. I prefer fresh scents like beach walk from Yankee Candle which you can find HERE! 

5. Desk Lamp:
Everyone needs some sort of lighting in their office. I chose this lamp as it is a easy to use adjustable lamp, so great for a desk. It is from Ikea so also really affordable which always helps, you can find it HERE! 

6. Cardboard Letters:
I really want some Letters to use as book ends for all my blogging inspirational books. I would love to get A and Z for the alphabet. I would either paint or get some cool wrapping paper to cover them in! You can find them HERE! 

7. White Swivel Chair:
I think a swivel chair is a necessity for a desk, for all those moments when your bored and spinning around on a chair can give a bit of inspiration. I like this one because it fits in with the desk, it's from Ikea and you can find it HERE! 
8. Magazine Storage Basket:
I find magazines great for keeping up with trends and really inspiring for blog posts, so I like to keep a few of my old favorites and current ones for when I'm feeling stuck in a rut! I think this storage basket is great for keeping them tidy but in keeping with the decor
HERE

What would you include in your Office? 

Thanks so much to Rachel for having me as a Guest on her lovely blog! 


Tuesday, 23 July 2013

GUEST POST - Colour on Friday Gone by Monday.


The dip dye has made a big impact within the world of hair and it doesn’t seem to be going anywhere soon. Summer 2013 has seen the trend becoming even bigger news with everyone adding a stroke of colour to their summer dip dye locks. However, colouring ones hair blues, purples and pinks is not always a realistic and practical commitment that many are happy to make to their hair (consider the startled looks around the office on Monday morning as you stroll in with bubblegum pink tips). It was therefore, only a matter of time before a temporary version was created; all hail the hair chalk! Hair chalking has become a hair sensation, allowing you to show off electric blue locks one night and then return to your original colour the next day. It has particularly become a popular purchase for many festival goers, looking to achieve a quirky look for the weekend. Think of all the fun and creative things you can try out on your hair without any of the, possibly not so sensible, commitments.

What to use?

There are a few different options out there to try for temporarily giving yourself a colourful dip dye look. These include the hair chalk, the hair shadow and the comb in hair colour and all with their own pros and cons...

I have tried colouring my tips with the comb in hair colour http://www.urbanoutfitters.co.uk/pink-comb-in-temporary-hair-dye/invt/5763400303222/ and the hair chalk and have experienced quite different results. For me, the hair chalk won hands down compared to the comb in hair colour. Unlike the hair chalk, the comb in colour is a wet gel like consistency that you need to allow time to dry before you can head out. The drying time for me took around half an hour to 45 minutes and I was stuck sitting around in a towel as I feared the wet colour could stain the white dress I planned to wear. Once dried, it did provide a subtle light pink colouring to my tips, i think however this was helped by my already light blonde hair, my darker haired friend did not have such great success! The hair chalking, however, was a much more simple and effective way to add a temporary colourful dip dye look to your hair, no matter the colour of your hair. On that note, I am therefore going to share a few useful tips for trying out hair chalking. Let’s get colouring!

Top Tips for Successfully Chalking Your Hair:
  • All you will need is your chosen hair chalk, a water bottle, a towel and protective gloves. Be careful to lay something down when applying the chalk, it can get a little messy!
  • If your hair colour is anything other than blonde you will have to wet the area being coloured first. The water will help the colour to attach to your hair. The wetter the hair, the deeper the colour
  • If you are blonde however, applying water first will mean the colour will stay on your hair for a longer period of time. If you want coloured tips but for one night only miss out adding water first.
  • Choose semi thick strands of hair, twist the hair and chalk in a downward motion. Twisting the hair as you colour will make the chalk release more pigment and will therefore create a stronger colour
  • If you have wet the hair first, just add a little extra time to allow the hair to dry, I would recommend letting the water dry naturally.
  • Once dry, you can go over the colour with a straightening iron or curling tong to better seal in the colour.
Know the Best Colours for Your Hair:

Redheads – Be aware that certain colours will change when on your hair, for example colouring it yellow may come out more as an orange. Purples and greens are the best colour choices for this hair colour.

Black hair – Those with black hair need to invest in bright vibrant shades, cobalt blues and shocking pinks are an awesome dip dye contrast. Think of Jessie J for inspiration!

Brunettes – Depending on the shade, brunettes can get away with almost any colour. The lighter your hair the more intense the colour.

Blondes - And for the lucky people with blonde hair, the world is your oyster and you can try out just about any colour you so wish. A nice idea is to also try more than one colour on each strand to create a tie-dyed look, start with the lighter colour at the top of the strand going into a darker colour by the tip. Lauren Conrad once mastered this tie-dyed look with hair chalk brilliantly.


Considering chalking it up? Check out http://www.haircolorchalk.com/Default.asp and http://hairchalking.net/ for a great colourful range of hair chalks.

There you have my top tips for creating a hair chalk success, i hope you have all been inspired to get creative with your hair! If you want some more chalking inspiration check out our Pinterest http://pinterest.com/appointedd/chalk-it-up/ and facebook page for some colourful looks https://www.facebook.com/media/set/?set=a.390308461075103.1073741836.278318852274065&type=1


Bio:

Leah Hutcheon is the founder of appointedd.com, a brand new site where you can book salons and spas online, 24/7. She was recently featured in the BBC documentary, The Entrepreneurs. Appointedd also features salon reviews and has a hair and beauty blog, appointedd.com/blog.


Everything written here is done so by the blog owner and it may appear elsewhere.
All content and images © Beautyqueenuk unless otherwise stated. Blog design by Beautyqueenuk